Shadowfire
New member
Decided to break this out into its own thread so others can easily search it.
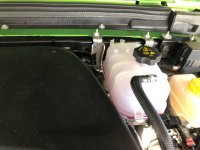
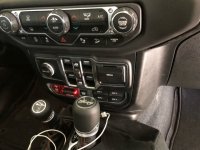
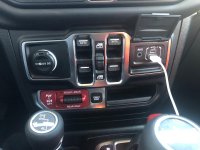
So it was pretty simple added the switches add the power module mounts up next to the coolant bottle wires run behind the bottle bracket along the fire wall tied to the wire channel with zip ties. I reviewed the written instructions and watched Matt’s video from CJ’s. Everything went as described except;
1. I didn’t have the rubber piece behind the nut under the kick panel..my nut was plastic so the rubber isn’t needed I guess.
2. He really made the pin removal look simple..there is a plastic locking device you need to press up on it..the pick he used probably just went right under it.. if you use a small screwdriver just be aware..also inserting the replacement wire pay attention the rear plastic retainer has a tiny slot for the lock on the pin ..it only goes in 1 way.
3. The new plug plastic protector on the front pops of easy if you push up from the sides thru the slot not straight on
I ran the trailer wire the same time as the aux. I have not connected it to power yet but it is where it needs to be and as you can see is in the back seat area already. Called away for a honey do so it will just stay there for now. I’m running it in the wire conduit along the passenger side to the rear light. I’m sure someone has a tube video.
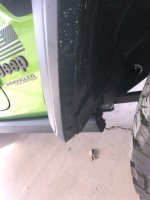
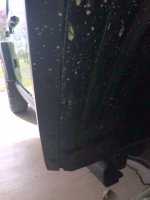
The grommet on the firewall behind the glove box has got a gap between the passenger and firewall I used my finger and some grease to open it up from the inside passenger side as I got to the outer layer I just poked it so I could find it on the firewall then I ran a piece of coat hanger back towards the passenger just pierced it the went back in with my finger and grabbed it. You will need 2 people just a hand so as not to poke a bundle. I used dielectric grease to ease the wire pull through.*
So it took me about 5 hrs to complete it. Removing the center console was nerve racking, the de-pin and re-pin, building the new plug was check double check. Finally I’m thinking of not going back with the plastic rivets they are stupid. I’m gonna try the push pin style, I only had to pull 3 to get to the wiring and the push style at the bottom 1 broke off. I still need the program but the only fail light was for ESS disabled no power to switches or options on the uconnect radio until enabled (programmed by dealer or Tazer).1. Run the power and grounds to their locations but don’t connect them until done. Reason being you run the risk of blowing the inline fuse. The instructions say to disconnect the batteries and fuses as to render the vehicle powerless but if you make your connections your wires will be hot.
NOTE: It turned out the ESS fault was not due to not being programmed for aux it was a loose connection I found by going back over my work. Seems the Orange jumper in the new plug wasn’t making a good connection. Since that was the only problem I encountered if you wanted to disable your ESS that will do it. Finally unlike the factory installed aux switches the kit only has 4 wires that tuck behind the kick panel and each is labeled Aux1 thru 4. I believe the factory install set has 6 wires and no labels. I believe for the $200 I spent and the few hrs of work done it was worth it. I believe as a factory option it would have been better and cost more as a factory option however you get the upgraded alternator and the tow package. Which for me is in work for me. Overall I know more about and where the fuses and connections are if future problems arise and I know now how to do it all again if necessary.
Also, I took it to the dealer for programming and they took care of it for free. The ESS fail didn’t show up as any code for the dealer they had no clue as to what was up with it. I thought it was strange that it kicked no codes anyway when I got back home I rechecked my work and found the loose connection. I have a feeling ESS is going to kick their ass for a while until they have seen more fails. Especially if It doesn’t kick any codes or maybe I got lucky and found the one place you can disconnect it and not have a code. The mechanic didn’t even notice the ESS disabled light when he took it back to the garage.
So it was pretty simple added the switches add the power module mounts up next to the coolant bottle wires run behind the bottle bracket along the fire wall tied to the wire channel with zip ties. I reviewed the written instructions and watched Matt’s video from CJ’s. Everything went as described except;
1. I didn’t have the rubber piece behind the nut under the kick panel..my nut was plastic so the rubber isn’t needed I guess.
2. He really made the pin removal look simple..there is a plastic locking device you need to press up on it..the pick he used probably just went right under it.. if you use a small screwdriver just be aware..also inserting the replacement wire pay attention the rear plastic retainer has a tiny slot for the lock on the pin ..it only goes in 1 way.
3. The new plug plastic protector on the front pops of easy if you push up from the sides thru the slot not straight on
I ran the trailer wire the same time as the aux. I have not connected it to power yet but it is where it needs to be and as you can see is in the back seat area already. Called away for a honey do so it will just stay there for now. I’m running it in the wire conduit along the passenger side to the rear light. I’m sure someone has a tube video.
The grommet on the firewall behind the glove box has got a gap between the passenger and firewall I used my finger and some grease to open it up from the inside passenger side as I got to the outer layer I just poked it so I could find it on the firewall then I ran a piece of coat hanger back towards the passenger just pierced it the went back in with my finger and grabbed it. You will need 2 people just a hand so as not to poke a bundle. I used dielectric grease to ease the wire pull through.*
So it took me about 5 hrs to complete it. Removing the center console was nerve racking, the de-pin and re-pin, building the new plug was check double check. Finally I’m thinking of not going back with the plastic rivets they are stupid. I’m gonna try the push pin style, I only had to pull 3 to get to the wiring and the push style at the bottom 1 broke off. I still need the program but the only fail light was for ESS disabled no power to switches or options on the uconnect radio until enabled (programmed by dealer or Tazer).1. Run the power and grounds to their locations but don’t connect them until done. Reason being you run the risk of blowing the inline fuse. The instructions say to disconnect the batteries and fuses as to render the vehicle powerless but if you make your connections your wires will be hot.
NOTE: It turned out the ESS fault was not due to not being programmed for aux it was a loose connection I found by going back over my work. Seems the Orange jumper in the new plug wasn’t making a good connection. Since that was the only problem I encountered if you wanted to disable your ESS that will do it. Finally unlike the factory installed aux switches the kit only has 4 wires that tuck behind the kick panel and each is labeled Aux1 thru 4. I believe the factory install set has 6 wires and no labels. I believe for the $200 I spent and the few hrs of work done it was worth it. I believe as a factory option it would have been better and cost more as a factory option however you get the upgraded alternator and the tow package. Which for me is in work for me. Overall I know more about and where the fuses and connections are if future problems arise and I know now how to do it all again if necessary.
Also, I took it to the dealer for programming and they took care of it for free. The ESS fail didn’t show up as any code for the dealer they had no clue as to what was up with it. I thought it was strange that it kicked no codes anyway when I got back home I rechecked my work and found the loose connection. I have a feeling ESS is going to kick their ass for a while until they have seen more fails. Especially if It doesn’t kick any codes or maybe I got lucky and found the one place you can disconnect it and not have a code. The mechanic didn’t even notice the ESS disabled light when he took it back to the garage.